
You run a business. And while you might feel very attached to the email account you opened when you were a pre-teen—dragonmaster93[at]gmail.com does have a nice ring to it—it’s time to swap that out for one that ends with your business domain name.
But here’s the thing: most custom domain hosting platforms have outdated email interfaces and features. Plus, you don’t want to open two entirely different platforms just to access your emails. Instead, you can connect your custom domain to Gmail.
Here, I’ll show you free—provided you already have domain hosting—and paid (Google Workspace) solutions for setting up a custom domain email that allows you to send emails from your domain through Gmail.
Table of contents:
Key concepts explained, so we’re on the same page
While you don’t need to be a tech expert to complete this setup, it does get a little technical at some point. So, I’ll start by explaining some terms and concepts so it’s easier for you to follow through. Feel free to jump ahead if you want to wing it.
What is a custom domain email?
A custom domain email is an email address that uses a personalized domain—usually your website—instead of a generic one like gmail.com, yahoo.com, icloud.com, and so on.
For example, a custom domain email address might look like [email protected] or [email protected], while a generic one looks like [email protected] or [email protected].
A custom domain email shows potential clients you’re serious about and invested in your business.
What’s the difference between Gmail and Google Workspace?
Gmail and Google Workspace are both email services provided by Google, but they serve different purposes and target different user needs.
-
Gmail is free and allows users to send and receive emails while integrating with other Google services like Docs, Drive, and Calendar. Billions of people use Gmail accounts for personal communications.
-
Google Workspace (formerly G Suite) is a business-grade version of Gmail and other Google tools and services. It lets you create custom email addresses that match your business name and gives you access to enhanced features like secure video conferencing, advanced security controls, and expanded storage.
What is an email alias?
An email alias is an alternate email address that redirects to your primary inbox. It doesn’t have its own login or mailbox—it just forwards messages to another email you already own.
For example, say my primary email is [email protected]. I could set up aliases like [email protected] or [email protected].
Any emails sent to these alternate addresses will land in my primary email inbox at [email protected].
What is DNS?
DNS stands for domain name system.
The system translates easy-to-remember domain names like yourwebsite.com into the numerical IP addresses that computers use to find each other on the internet.
Think of DNS as the internet’s phonebook: when someone types your domain into a browser or email app, DNS helps route that request to the right place—whether that’s your website or your email inbox. It basically tells the internet, “This is where this domain is.”
Without DNS, we’d all be typing in IP addresses like 172.217.3.110 instead of something simple like google.com. Pretty important.
What is an MX Record?
MX stands for Mail Exchange.
An MX record is a special DNS record that tells email services where to deliver emails sent to your domain. It connects your email address (like [email protected]) to your inbox—whether that’s Gmail, Outlook, or elsewhere.
If your DNS is the phonebook, your MX record is the part that says, “Here’s the number for emails.”
What is POP3?
POP3 stands for Post Office Protocol version 3. It’s how your email app (like Gmail, Outlook, or Apple Mail) pulls messages from your email server and downloads them to your device.
POP3 is mainly used for receiving email, not sending.
What is SMTP?
SMTP stands for Simple Mail Transfer Protocol. This protocol sends emails from your device to an email server and, from there, to the recipient’s inbox.
Now that we’ve cleared the technical jargon, here’s how to connect your custom domain to Gmail.
Option 1: Use Gmail with your custom domain through Google Workspace
Pros:
-
You can access Google Drive, Calendar, Meet, Docs, Sheets, and more, which is perfect for solo founders or growing teams.
-
From one admin dashboard, you can create accounts for team members, manage permissions, and reset passwords.
-
You can create up to 30 aliases without paying for another account.
Cons:
-
It’s not free. Google Workspace starts at $6.30/user per month (if you choose the annual plan). That adds up quickly if you’re running a team or multiple accounts.
-
While Google walks you through it, domain verification and DNS updates can still be somewhat intimidating for non-technical people.
Custom domain emails are a feature of Google Workspace, so if you’re willing to pay, it’s part of the package. The lowest Google Workspace pricing tier—Business Starter—costs around $75/user/year when billed annually.
It’s a fair price, given that you’re getting a lot more than a custom email domain in Gmail. Here are a few other benefits:
-
Built-in spam filtering, phishing protection, and two-factor authentication (2FA).
-
Best-in-class calendar (Calendar), video conferencing app (Meet), cloud storage (Drive), document creation (Docs), and spreadsheet tool (Sheets).
-
Admin control, where you can manage team accounts, reset passwords, and control access—all from one dashboard.
I’d recommend this option if you want a hassle-free setup and don’t want to manually manage DNS records. It’s also a great choice if you have employees and need additional tools, like Drive and Meet, for team collaboration.
Here’s the setup process:
1. Sign up for Google Workspace
To sign up, visit Google Workspace, and click any of the “Get Started” buttons on the page.

Follow the prompt to enter your company name, company size, and location.

On the next page, enter your name and current email address. You can then choose whether to get a custom domain or continue your setup using your existing domain.

If you choose to get a new custom domain, it’ll cost you around $12/year for a .com domain extension. The price could go as high as $57/year for a .io extension.
The other option requires you to enter your current domain details.

Choose a username and a password for the new Google Workspace account. This username and password will work the same way regular Gmail accounts work.

Once you fill out your details and move to the next page, you’ll be asked to choose a plan and complete your payment.
Google typically recommends a plan for you. For me, it recommended the Business Starter plan, which was more expensive than what I needed. To change the plan, click Compare plans at the bottom of the screen.

Other plans should appear on the screen, and you can then start a 14-day free trial for the one you want.

The next steps are where it starts to get technical.
2. Verify your domain
To ensure you own the domain you entered during signup, Google will ask you to verify your domain.
The Domain setup page comes up after you’ve entered your billing details and started a free trial. Once you click Get started, Google will automatically detect the company hosting your domain name.

Mine is with Hostinger. If Google doesn’t get it right, you can select other options from the dropdown menu.

You’ll now be required to copy and add a verification code to the DNS section of your domain host website.

Finding your site’s DNS section looks different depending on the hosting company you’re using.
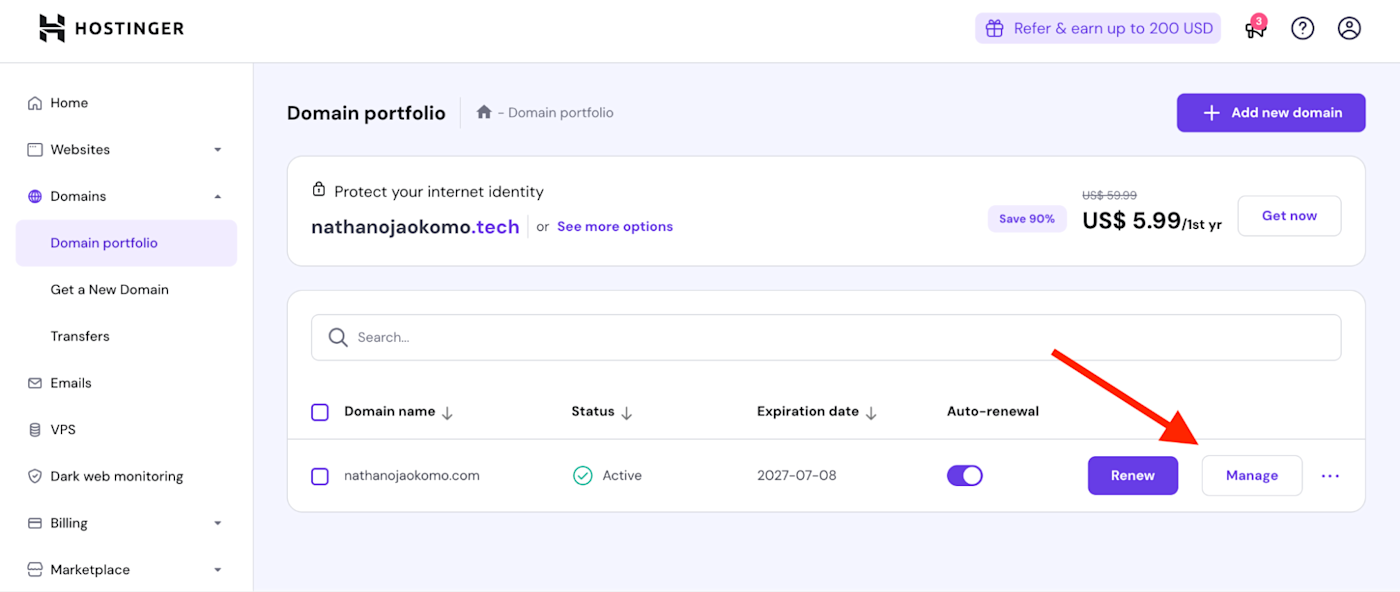
Here’s how to find yours if you’re using Hostinger like I am:
-
Log in to your hPanel (you might use cPanel for other domain hosts).
-
Click on the Domains sidebar and then Domains portfolio from the dropdown menu.
-
Click Manage on the relevant domain name.
-
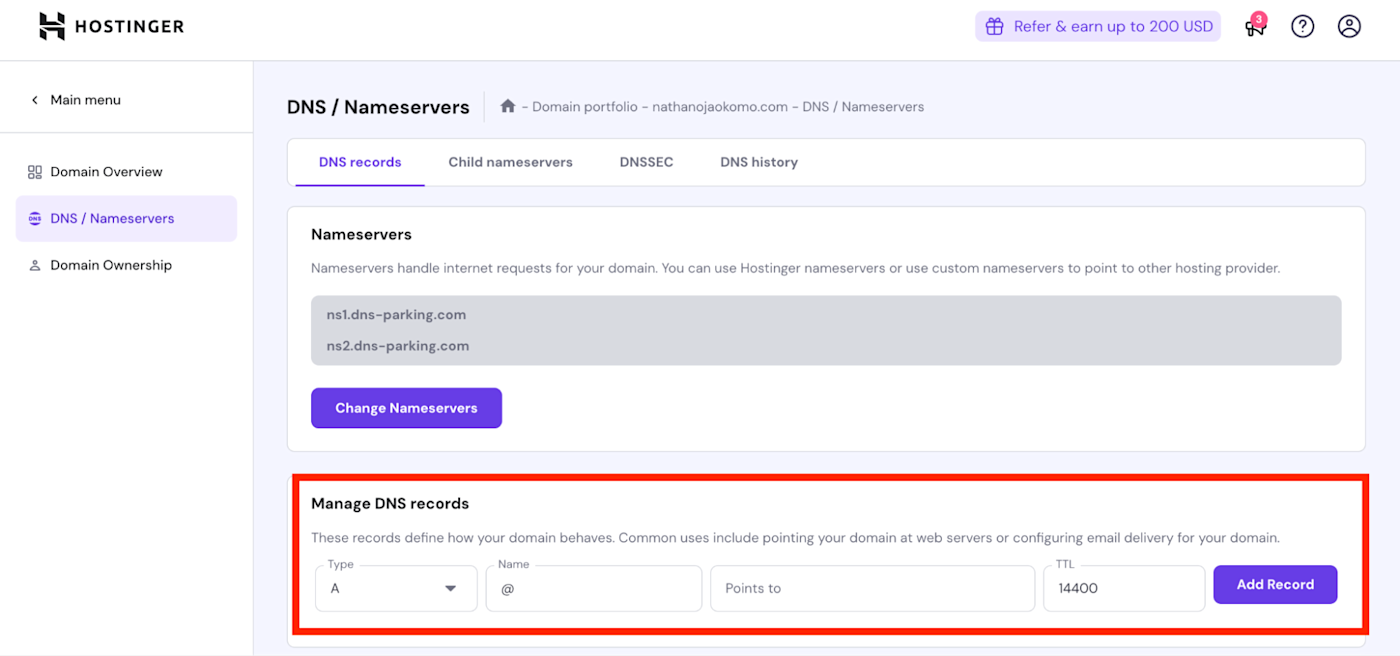
Click DNS/Nameservers from the new sidebar.
-
Add the TXT record in the Manager DNS records section. Remember to change the record type from A to TXT. The option to change the record type will appear once you click the dropdown menu.


Now head back to your Google Workspace dashboard to confirm that you’ve added the TXT record to your website.
If done right, it takes about a minute for Google to confirm your domain verification.

Click Activate Gmail to set up your account to receive and send emails from your custom domain.
If you want to add other users or aliases, now is a good time to do it. Otherwise, keep going.
4. Add MX records
To continue, click Proceed with activation.

Similar to how you added your TXT records to verify your domain, Google will ask you to add MX records to the DNS section of your domain host website. Here’s how to do that.

-
First, copy the MX records from your Google Workspace.
-
Navigate to your hPanel or cPanel, and head to the DNS section like you did last time.
-
Once there, enter the details you copied from your Google Workspace and save.
-
Head back to your Google Workspace, and confirm you’ve updated the code on your domain host.
It might take a couple of minutes to confirm, but once it’s done, you should get a success message.
To show that it works, I sent a test message from my custom domain in Gmail to my personal account.

And replied to confirm I can receive emails, too.

It works.
Option 2: Free workaround using Gmail and existing domain hosting
Pros:
-
It costs nothing extra besides your domain/hosting fees, which you already pay for your website. You don’t need Google Workspace or a paid Gmail upgrade to use this setup.
-
You can manage everything in one place without constantly switching accounts if you’re juggling multiple email accounts (e.g., your personal Gmail and your business email).
-
Most domain/email hosting providers, such as Namecheap, Bluehost, and GoDaddy, support POP3/SMTP, so it’s widely compatible.
Cons:
-
POP3 typically fetches emails in intervals (e.g., every 15–60 minutes), not instantly. So you might experience delays in receiving new messages.
-
You’ll need to enter server names, port numbers, and toggle security settings. It’s not super difficult, but it’s more involved than Google Workspace’s plug-and-play setup.
This method involves asking Gmail to pull emails from your web host through POP3 and SMTP settings.
It works well for me because I already have an email hosting service through my web hosting company. That means I don’t have to pay for Google Workspace but still enjoy a lot of its benefits. All you need for this setup are your Gmail account and domain hosting with email service. Here’s how to set it up.
1. Create a free Gmail account
Create a new Gmail account. (You can use your existing personal Gmail account if you can manage your inbox well, but I don’t recommend it.)
2. Create custom emails
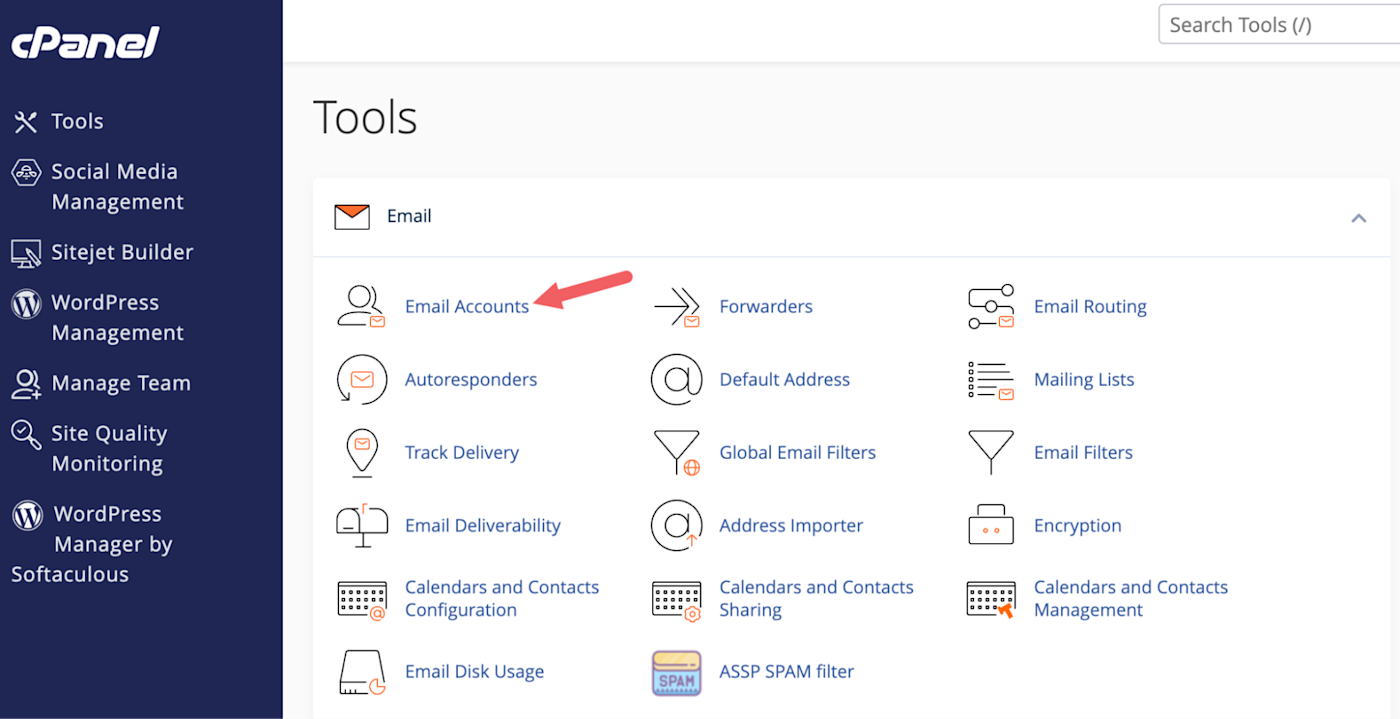
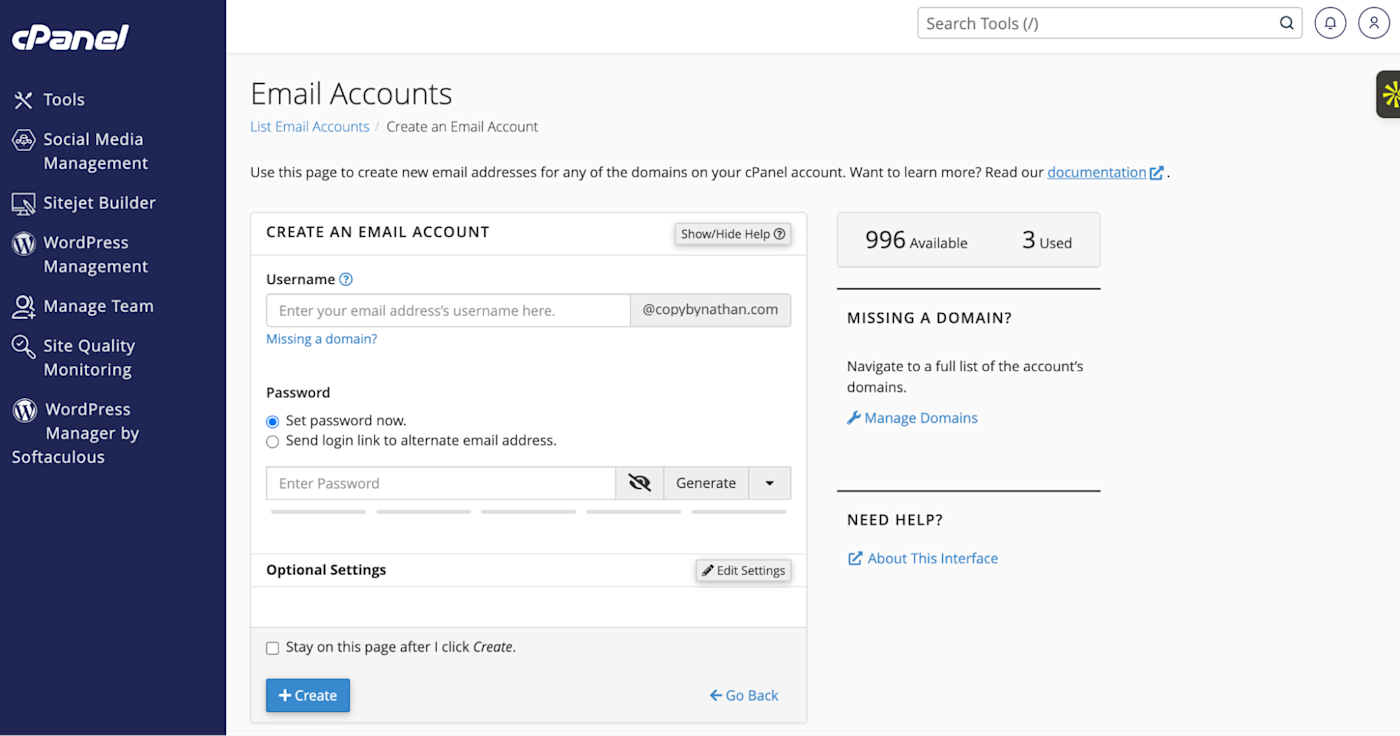
To create custom emails, head over to your cPanel or hPanel, depending on the hosting company you use.
Since I used hPanel earlier, I’ll use cPanel for this walkthrough.
-
From your cPanel dashboard, click Email Accounts.
-
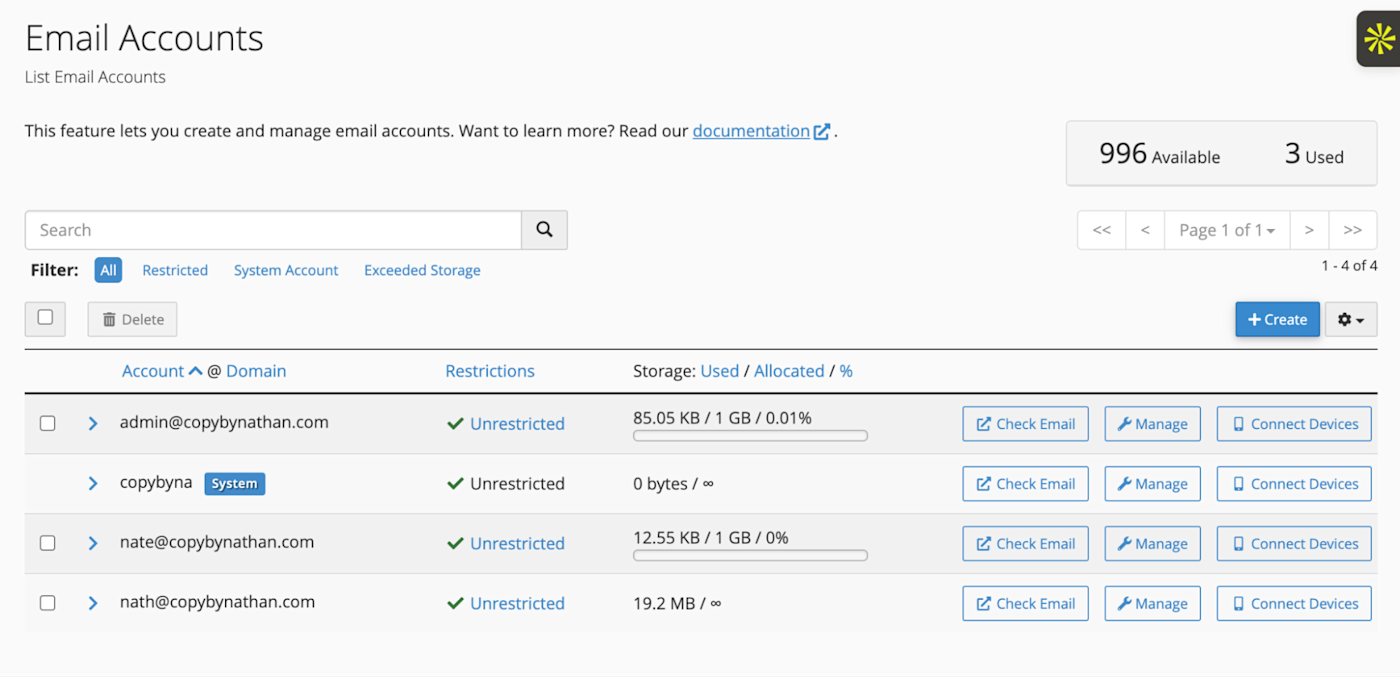
From there, click Create to set up a new email account—unless you already have one you’d like to connect to Gmail.
-
Choose a username and password you want associated with the account, and complete your account creation.
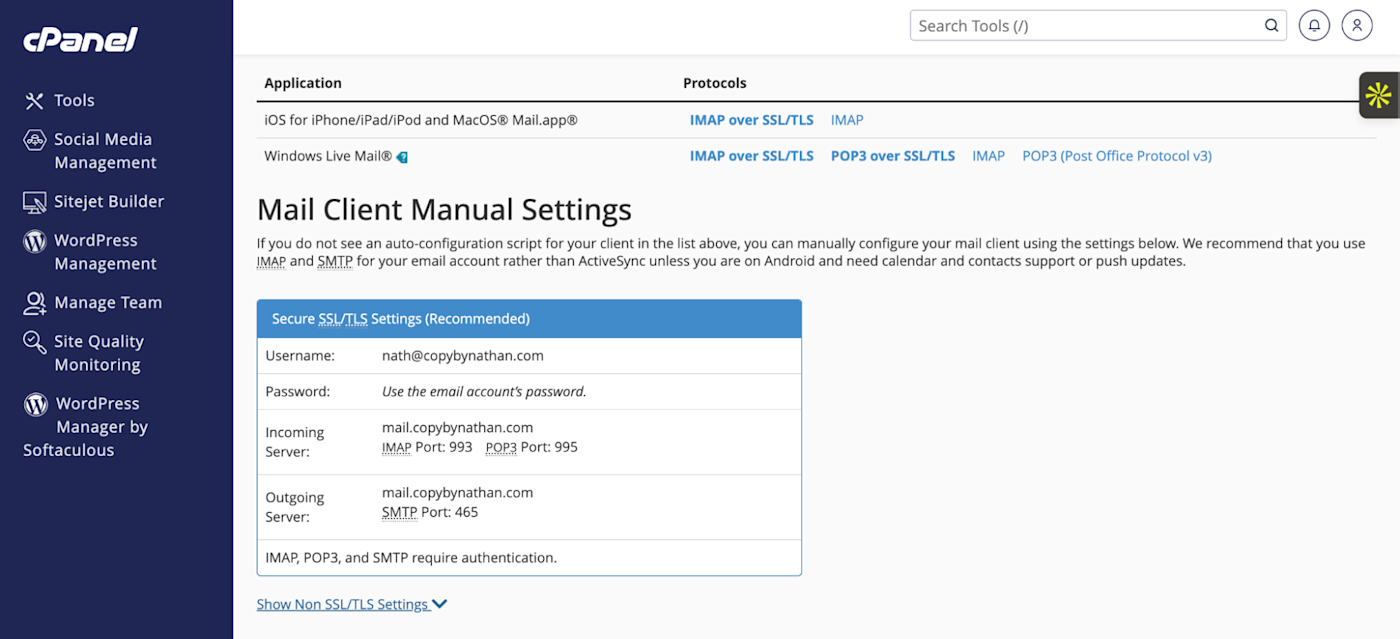
-
Once you’ve created the email, click Connect Devices. You should see a page that shows information about your email account, like its incoming and outgoing server details.
-
Copy or jot down those details. You’ll need them later.


Now let’s head over to Gmail.
3. Add an new email account to Gmail
-
In Gmail, click the gear settings icon at the top-right corner, then choose See all Settings.
-
Click the Accounts and Import tab.
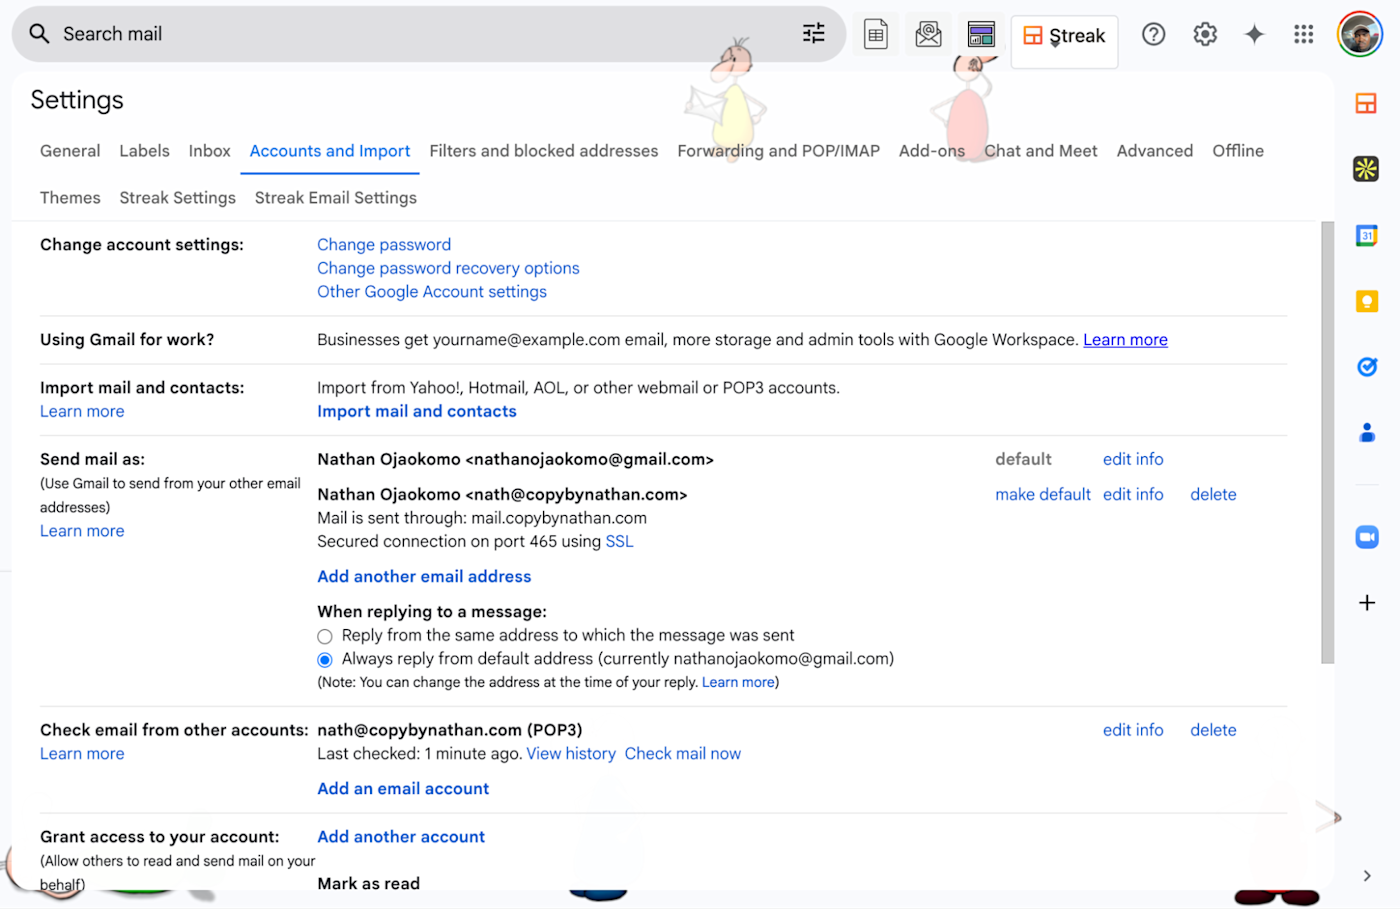
-
Under Check email from other accounts, select Add an email account. Don’t confuse this with the links that say Add another email address and Add another account.
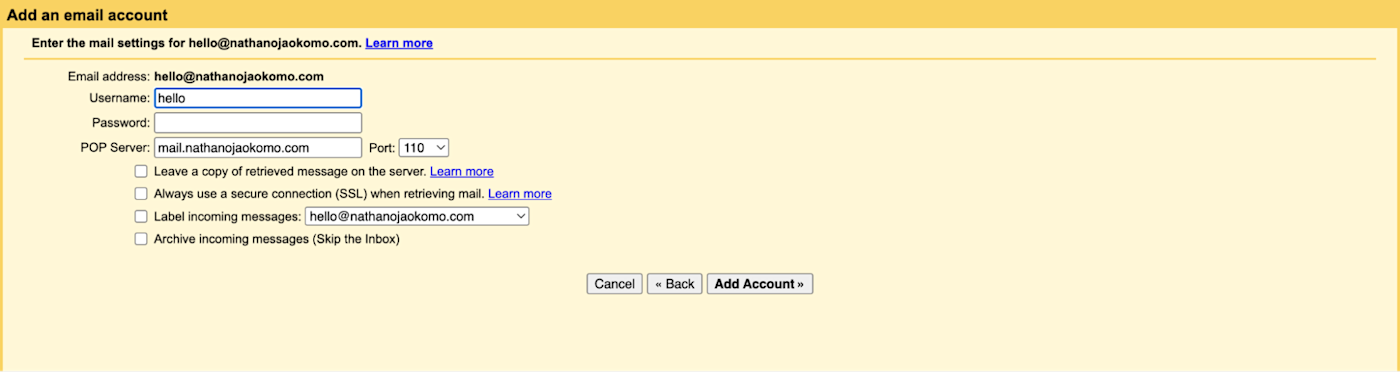
-
If you click the correct link, you’ll see this page with a yellow background asking you to enter your email address. The email address you enter here should be the one you created from your cPanel or hPanel.

-
On the next page, select Import emails from my other account (POP3) and click Next.

-
Now, fill out the relevant details you copied from the cPanel, like the POP server and Port number. Then click Add Account.


Your new account should be added to Gmail now, and you should be able to receive emails. But you can’t send emails yet, so let’s fix that.
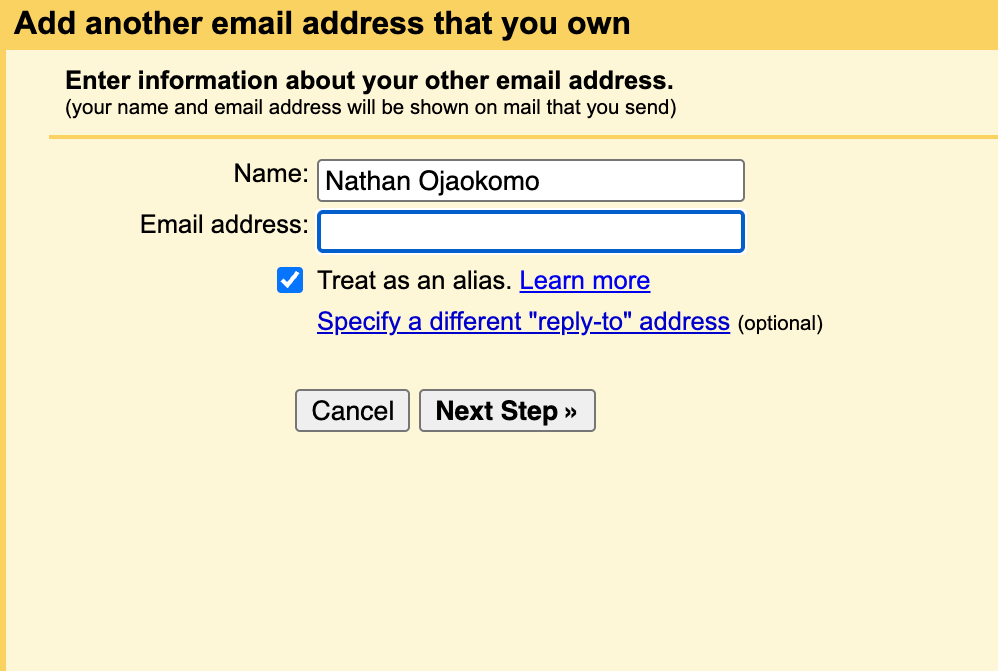
4. Add the custom “Send mail as” alias in Gmail
-
Head back to your Gmail settings. This time, under Send email as, click Add another email address.
-
Fill in the name and email address, and select Treat as an alias. Click Next Step.
-
Add SMTP information from the cPanel.
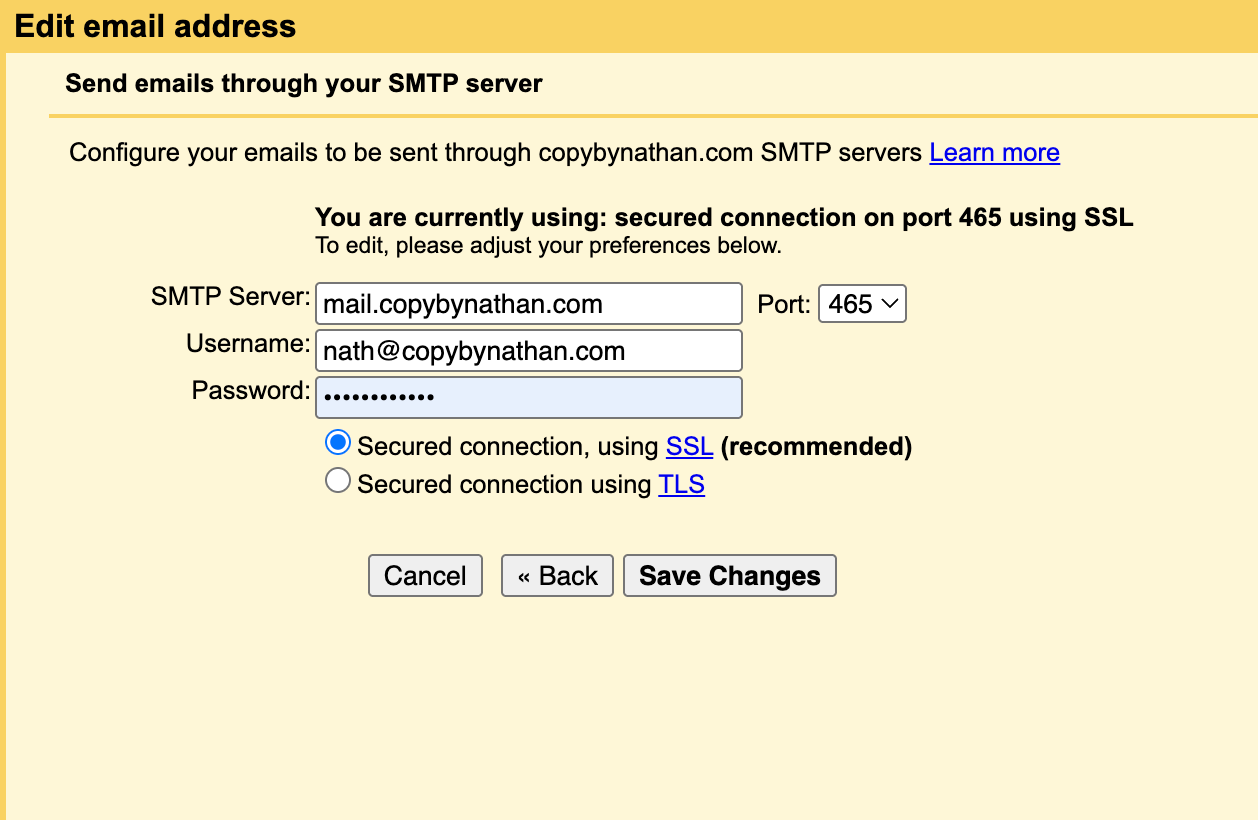
-
Once you save changes, you’ll receive a confirmation email from Gmail. Click the link from the confirmation email, and you’re all set.


Common mistakes and how to avoid them
Because of the unique setup required here, there are a lot of potential issues. Here are some mistakes I’ve made, and how you can prevent them.
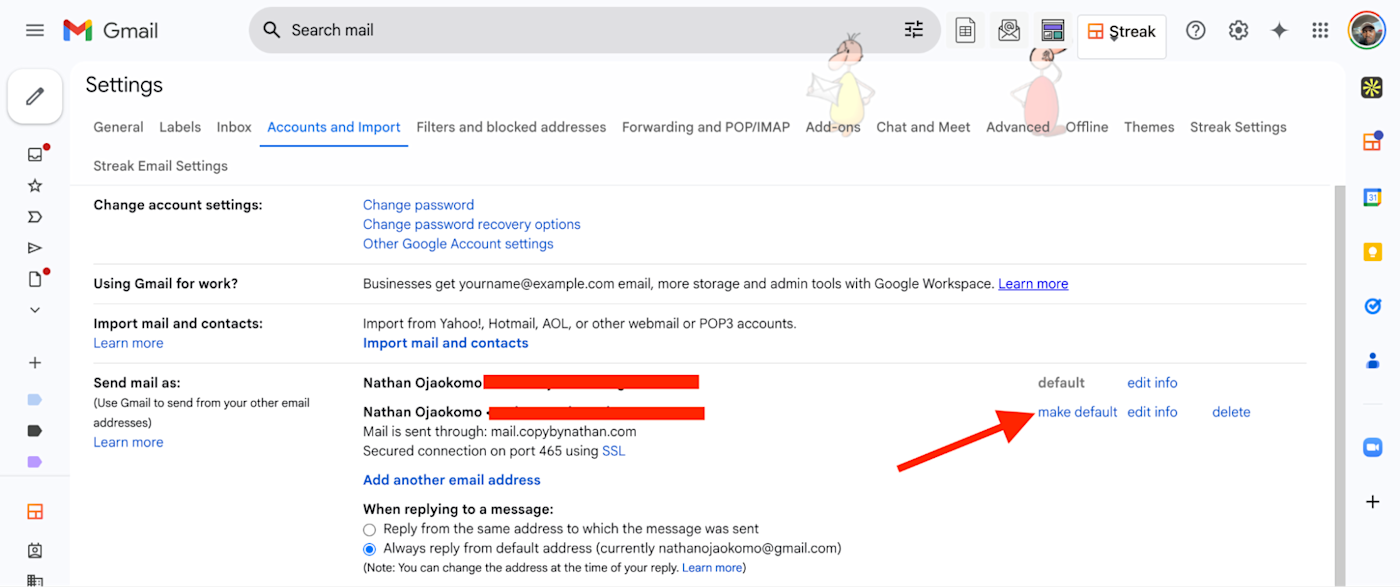
Sending from the wrong email
After the setup, especially if you use the free workaround with your existing hosting, your Gmail From field will look something like this:

The default address is my personal Gmail account, and when sending work-related stuff, it’s easy to forget that I could be sending from my personal account.
To prevent this mistake from happening, make the custom domain the default sender address. Here’s how.
-
Go to the Accounts and Import tab in your Gmail settings.
-
Click make default next to the email address you want as the default.

Forgetting to renew your domain hosting
This one’s easy to overlook—until your email suddenly stops working.
Your domain name, like yourwebsite.com, needs to be renewed (usually annually). If it expires, everything tied to it—including your custom email—goes offline. And you might not notice until someone tells you they’ve been emailing you and getting bounced messages.
To avoid this, set up auto-renewal with your domain registrar, and ensure your payment method is up to date. Alternatively, you can set a recurring calendar reminder 2–4 weeks before renewal.
Choosing the wrong domain registrar
Selecting a registrar with hidden fees or poor customer support can complicate your setup. Some lure you in with a low first-year price, then hit you with expensive renewals or hidden fees. Others have clunky interfaces or slow customer support, which makes setup unnecessarily frustrating, especially when configuring DNS records or fixing an issue quickly.
The best solution is to opt for reputable registrars and hosts.
Skipping security measures
Once your custom email is set up, it becomes a core part of how people reach you. This means it’s also a prime target for phishing attacks and hackers, especially if you use that email to sign in to important accounts like banking, domain hosting, or cloud tools.
The solution here is simple: use a strong, unique password. Better yet, store it in a password manager so you don’t have to memorize it. Then, enable two-factor authentication (2FA) through your Google account settings.
Do more with your custom domain email
Setting up a custom domain email that works with Gmail is one of the best moves you can make to look more professional and streamline communication.
Once your custom domain email is up and running, connect Gmail with Zapier so you can send data to and from your inbox across your tech stack. By connecting Gmail to Zapier, you can do things like create a to-do list from your inbox, automatically save email attachments, or even use AI to automatically label your emails.
Learn more about how to automate Gmail, or get started with one of these pre-made templates.
Zapier is the most connected AI orchestration platform—integrating with thousands of apps from partners like Google, Salesforce, and Microsoft. Use interfaces, data tables, and logic to build secure, automated, AI-powered systems for your business-critical workflows across your organization’s technology stack. Learn more.
Related reading: